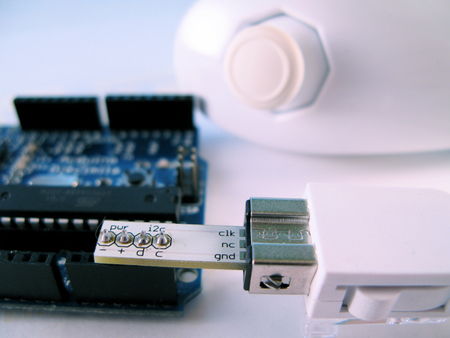
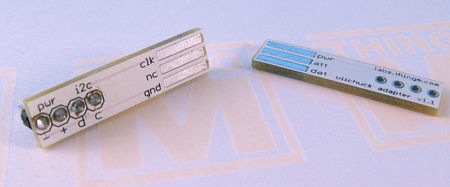
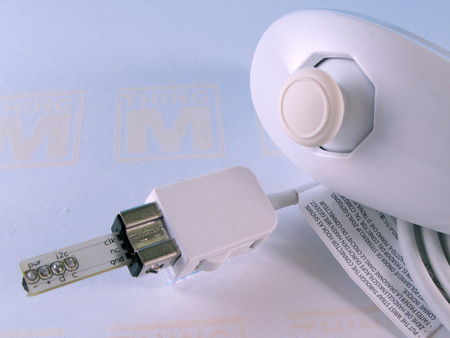
В общем подключив его имеем пульт управления с 3х осевым акселерометром, 2х осевой миниджойстик, 2х кнопки.
Для наглядности:
Подключаем нунчак по протоколу I2C, к SDA SCL

Питание в идеале надо 3,3в, но как показали многочисленные форумы, работает и от 5в, от самой Ардуины.
В некоторых схемах используют питание и землю с аналоговых выходов самой Ардуины.
Приобрести это чудо можно легко на ebay'e
Цены на китайские от 1$-10$
Я брал тут
http://cgi.ebay.com/ws/eBayISAPI.dll?ViewItem&item=220644955204&ssPageName=ADME:X:RTQ:US:1123#ht_3052wt_977
Самое главное: Китайские дешевые нунчаки, за 1-3$ инициализируются не как оригинальные, код инициализации нужно заменять.
В оригинале код инициализации:
- Код: Выделить всё • Развернуть
//========================================
Wire.begin();                // join i2c bus as master
    Wire.beginTransmission(0x52);// transmit to device 0x52
    Wire.send(0x40);// sends memory address
    Wire.send(0x00);// sends sent a zero.
    Wire.endTransmission();// stop transmitting
//========================================
Для инициализации китайских дешевых, вместо него пишем:
- Код: Выделить всё • Развернуть
//========================================
byte cnt;
uint8_t ctrlr_type[6];

Wire.begin();

// init controller
delay(1);
Wire.beginTransmission(0x52);   // device address
Wire.send(0xF0);              // 1st initialisation register
Wire.send(0x55);              // 1st initialisation value
Wire.endTransmission();
delay(1);
Wire.beginTransmission(0x52);
Wire.send(0xFB);              // 2nd initialisation register
Wire.send(0x00);              // 2nd initialisation value
Wire.endTransmission();
delay(1);

// read the extension type from the register block
Wire.beginTransmission(0x52);
Wire.send(0xFA);              // extension type register
Wire.endTransmission();
Wire.beginTransmission(0x52);
Wire.requestFrom(0x52, 6);            // request data from controller
for (cnt = 0; cnt < 6; cnt++) {
    if (Wire.available()) {
        ctrlr_type[cnt] = Wire.receive(); // Should be 0x0000 A420 0101 for Classic Controller, 0x0000 A420 0000 for nunchuck
    }
}
Wire.endTransmission();
delay(1);

// send the crypto key (zeros), in 3 blocks of 6, 6 & 4.
Wire.beginTransmission(0x52);
Wire.send(0xF0);              // crypto key command register
Wire.send(0xAA);              // sends crypto enable notice
Wire.endTransmission();
delay(1);
Wire.beginTransmission(0x52);
Wire.send(0x40);              // crypto key data address
for (cnt = 0; cnt < 6; cnt++) {
    Wire.send(0x00);              // sends 1st key block (zeros)
}
Wire.endTransmission();
Wire.beginTransmission(0x52);
Wire.send(0x40);              // sends memory address
for (cnt = 6; cnt < 12; cnt++) {
    Wire.send(0x00);              // sends 2nd key block (zeros)
}
Wire.endTransmission();
Wire.beginTransmission(0x52);
Wire.send(0x40);              // sends memory address
for (cnt = 12; cnt < 16; cnt++) {
    Wire.send(0x00);              // sends 3rd key block (zeros)
}
Wire.endTransmission();
delay(1);
// end device init
//========================================
И все прекрасно работает.
Кодов с использованием нунчак полно, главное не забываем менять строку инициализации.
Вот один из примеров.
- Код: Выделить всё • Развернуть
//========================================
/*
 * NunchuckPrint
 *
 * 2007 Tod E. Kurt, http://todbot.com/blog/
 *
 * The Wii Nunchuck reading code is taken from Windmeadow Labs
 *   http://www.windmeadow.com/node/42
 */

#include <Wire.h>


void setup()
{
  Serial.begin(19200);
 // nunchuck_setpowerpins(); // use analog pins 2&3 as fake gnd & pwr
  nunchuck_init(); // send the initilization handshake
  Serial.print ("Finished setup\n");
}

void loop()
{
  nunchuck_get_data();
  nunchuck_print_data();
  delay(100);
}


//
// Nunchuck functions
//

static uint8_t nunchuck_buf[6];   // array to store nunchuck data,

// Uses port C (analog in) pins as power & ground for Nunchuck
//static void nunchuck_setpowerpins()
//{
//#define pwrpin PORTC3
//#define gndpin PORTC2
 //   DDRC |= _BV(pwrpin) | _BV(gndpin);
 //   PORTC &=~ _BV(gndpin);
//    PORTC |=  _BV(pwrpin);
//    delay(100);  // wait for things to stabilize
//}

// initialize the I2C system, join the I2C bus,
// and tell the nunchuck we're talking to it
void nunchuck_init()
{
//  Wire.begin();                   // join i2c bus as master
//  Wire.beginTransmission(0x52);   // transmit to device 0x52
//  Wire.send(0x40);      // sends memory address
//  Wire.send(0x00);      // sends sent a zero.
//  Wire.endTransmission();   // stop transmitting
byte cnt;
uint8_t ctrlr_type[6];
Wire.begin();

// init controller
delay(1);
Wire.beginTransmission(0x52);   // device address
Wire.send(0xF0);              // 1st initialisation register
Wire.send(0x55);              // 1st initialisation value
Wire.endTransmission();
delay(1);
Wire.beginTransmission(0x52);
Wire.send(0xFB);              // 2nd initialisation register
Wire.send(0x00);              // 2nd initialisation value
Wire.endTransmission();
delay(1);

// read the extension type from the register block
Wire.beginTransmission(0x52);
Wire.send(0xFA);              // extension type register
Wire.endTransmission();
Wire.beginTransmission(0x52);
Wire.requestFrom(0x52, 6);            // request data from controller
for (cnt = 0; cnt < 6; cnt++) {
    if (Wire.available()) {
        ctrlr_type[cnt] = Wire.receive(); // Should be 0x0000 A420 0101 for Classic Controller, 0x0000 A420 0000 for nunchuck
    }
}
Wire.endTransmission();
delay(1);

// send the crypto key (zeros), in 3 blocks of 6, 6 & 4.
Wire.beginTransmission(0x52);
Wire.send(0xF0);              // crypto key command register
Wire.send(0xAA);              // sends crypto enable notice
Wire.endTransmission();
delay(1);
Wire.beginTransmission(0x52);
Wire.send(0x40);              // crypto key data address
for (cnt = 0; cnt < 6; cnt++) {
    Wire.send(0x00);              // sends 1st key block (zeros)
}
Wire.endTransmission();
Wire.beginTransmission(0x52);
Wire.send(0x40);              // sends memory address
for (cnt = 6; cnt < 12; cnt++) {
    Wire.send(0x00);              // sends 2nd key block (zeros)
}
Wire.endTransmission();
Wire.beginTransmission(0x52);
Wire.send(0x40);              // sends memory address
for (cnt = 12; cnt < 16; cnt++) {
    Wire.send(0x00);              // sends 3rd key block (zeros)
}
Wire.endTransmission();
delay(1);
// end device init
}

// Send a request for data to the nunchuck
// was "send_zero()"
void nunchuck_send_request()
{
  Wire.beginTransmission(0x52);   // transmit to device 0x52
  Wire.send(0x00);      // sends one byte
  Wire.endTransmission();   // stop transmitting
}

// Receive data back from the nunchuck,
int nunchuck_get_data()
{
    int cnt=0;
    Wire.requestFrom (0x52, 6);   // request data from nunchuck
    while (Wire.available ()) {
      // receive byte as an integer
      nunchuck_buf[cnt] = nunchuk_decode_byte(Wire.receive());
      cnt++;
    }
    nunchuck_send_request();  // send request for next data payload
    // If we recieved the 6 bytes, then go print them
    if (cnt >= 5) {
     return 1;   // success
    }
    return 0; //failure
}

// Print the input data we have recieved
// accel data is 10 bits long
// so we read 8 bits, then we have to add
// on the last 2 bits.  That is why I
// multiply them by 2 * 2
void nunchuck_print_data()
{
  static int i=0;
  int joy_x_axis = nunchuck_buf[0];
  int joy_y_axis = nunchuck_buf[1];
  int accel_x_axis = nunchuck_buf[2]; // * 2 * 2;
  int accel_y_axis = nunchuck_buf[3]; // * 2 * 2;
  int accel_z_axis = nunchuck_buf[4]; // * 2 * 2;

  int z_button = 0;
  int c_button = 0;

  // byte nunchuck_buf[5] contains bits for z and c buttons
  // it also contains the least significant bits for the accelerometer data
  // so we have to check each bit of byte outbuf[5]
  if ((nunchuck_buf[5] >> 0) & 1)
    z_button = 1;
  if ((nunchuck_buf[5] >> 1) & 1)
    c_button = 1;

  if ((nunchuck_buf[5] >> 2) & 1)
    accel_x_axis += 2;
  if ((nunchuck_buf[5] >> 3) & 1)
    accel_x_axis += 1;

  if ((nunchuck_buf[5] >> 4) & 1)
    accel_y_axis += 2;
  if ((nunchuck_buf[5] >> 5) & 1)
    accel_y_axis += 1;

  if ((nunchuck_buf[5] >> 6) & 1)
    accel_z_axis += 2;
  if ((nunchuck_buf[5] >> 7) & 1)
    accel_z_axis += 1;

  Serial.print(i,DEC);
  Serial.print("\t");

  Serial.print("joy:");
  Serial.print(joy_x_axis,DEC);
  Serial.print(",");
  Serial.print(joy_y_axis, DEC);
  Serial.print("  \t");

  Serial.print("acc:");
  Serial.print(accel_x_axis, DEC);
  Serial.print(",");
  Serial.print(accel_y_axis, DEC);
  Serial.print(",");
  Serial.print(accel_z_axis, DEC);
  Serial.print("\t");

  Serial.print("but:");
  Serial.print(z_button, DEC);
  Serial.print(",");
  Serial.print(c_button, DEC);

  Serial.print("\r\n");  // newline
  i++;
}

// Encode data to format that most wiimote drivers except
// only needed if you use one of the regular wiimote drivers
char nunchuk_decode_byte (char x)
{
  x = (x ^ 0x17) + 0x17;
  return x;
}
//========================================
И немного полезных ссылок:
Благодаря этому решилась проблема с инициализацией.
http://www.arduino.cc/cgi-bin/yabb2/YaBB.pl?num=1264805255/0
Подробное описание Wii remote
http://wiibrew.org/wiki/Wiimote#Extension_Controllers
О использовании фильтра Калмана
http://www.arduino.cc/cgi-bin/yabb2/YaBB.pl?num=1253202298
Полезная информация:
http://todbot.com/blog/2008/02/18/wiichuck-wii-nunchuck-adapter-available/


 и под видом оригиналов многие торгуют именно аналогами.